DENON DJ SC5000M PRIME


for VirtualDJ 8.5+
Last Update : July 2020


SETUP


Switch to Computer mode


When the SC5000M is powered on, it will be set to Standalone/Engine mode. To switch to Computer mode and control VirtualDJ you need to ...
- press on the Computer icon at the SC5000M screen
- or hold down for a second the VIEW button at the center-top panel of the device, select SOURCE, then pres on the Computer icon.

Firmware & Drivers


Firmware (both Windows and Mac) : Update the firmware of the unit to the latest available version from https://www.denondj.com/downloads

Drivers : (Windows only) Download and install the latest Windows drivers from https://www.denondj.com/downloads . It is strongly advised to install drivers prior plugging the unit to a USB computer port.

No driver is necessary to be installed on Mac OSX computers.

Note Due to Denon SDK incompatibility, the screens will be operational on Mac OSX 10.14 or later.,

VirtualDJ 8 Setup


Download and install VirtualDJ from http://www.virtualdj.com/download/index.html (in case you have not done already)

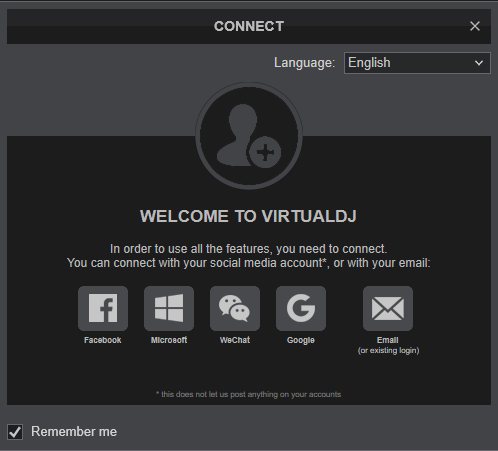
Once VirtualDJ is opened, a Login Window will appear. Login with your virtualdj.com account’s credentials.

A Pro Infinity or a Pro Subscription License is required to use the Denon DJ SC5000M. Without any of the above Licenses, the controller will operate for 10 minutes each time you restart VirtualDJ.
http://www.virtualdj.com/buy/index.html


A detection windows will appear next verifying proper connection.


Click to OK


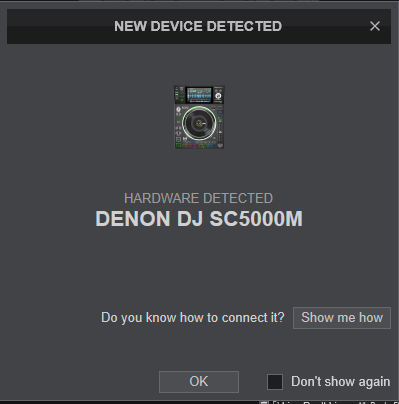
The unit is now ready to operate.


Note : The SC5000M doesn't offer a USB Audio Interface (sound card). See Audio Setup Options in VirtualDJ Manual


For further software settings please refer to the User Guide of VirtualDJ 8.
http://www.virtualdj.com/manuals/virtualdj8/index.html
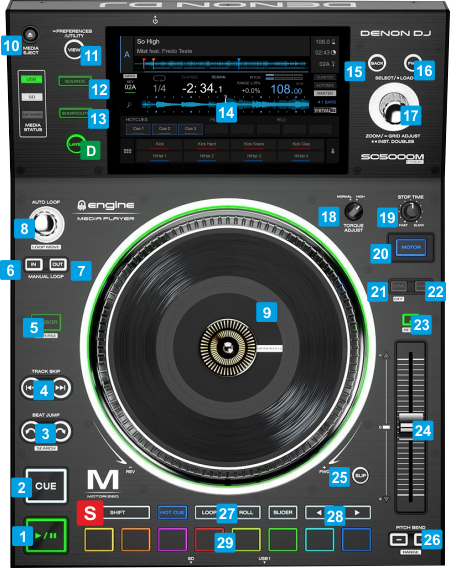
 

CONTROLS


KEY

ACTION

SHIFT (SECONDARY) ACTION

S SHIFT
Press this button down to access secondary actions as described in the SHIFT ACTION column
D LAYER
Select a deck for the unit to control
When a single device is connected or a 2 Decks skin is used , the SC5000M can be assigned to Left (A) or Right (B) Deck
When 2 devices are connected and a 4 Decks skin is used, the Left assigned device will toggle control for Left Decks (Deck A and C) and the Right-assigned device will toggle control for the Right Decks (B and D)
1 PLAY
Play-pause the track
Play-stutter track
2 CUE
When track is paused, sets a temporary Cue point and previews track while pressed if the Cue is set. Jump and stop to the Cue point when track is playing
Jumps at the beginning of the track
3 BEAT JUMP
Seamlessly move track forward/backwards by the same amount of beats as the selected loop size.
Fast seek through the track backwards/forward by 4 beats while pressed.
4 TRACK SKIP
Left Track Skip : Jump to the beginning of the track. Double-press the same button to load the previous track from the Browser List.
Right Track Skip : Loads the next track from the Browser List
5 CENSOR
Plays the track in reverse while pressed. When released, track will continue playing from the position it would have been if never used (CENSOR)
Toggle between Reverse and Normal playback
6 LOOP IN
Sets current position as the Start point (Loop In) of a manual loop. When in Loop, sets Jogwheel to Loop In Adjust mode and then use the Jogwheel to fine adjust the position of the Loop In point in time.
7 LOOP OUT
Sets current position as the End point (Loop Out) of a manual loop. When in Loop, sets Jogwheel to Loop Out Adjust mode and then use the Jogwheel to fine adjust the position of the Loop Out point in time.
8 LOOP
Half/double the size of the Loop in beats. Push to enable an auto-loop of the selected size in beats or push to exit the loop.
When in Loop, turn to move the loop backwards/forward by 1 beat
9 JOG
Motor wheel to scratch (if Motor mode is selected) or pitch bend. Loop In and Loop Out point adjustment (see Loop In/Out controls above)
The colored ring around the motor wheel will get the color of the assigned deck.
10 EJECT
Unload Track from Deck.
11 VIEW
Toggles between Normal Deck and Browser+Mini Deck views on the SC5000M screen.
Hold down for more than 1 second to open the SETTINGS view on the SC5000M screen.
12 SOURCE
Offers a confirmation panel on the SC5000M screen to switch to Standalone mode
13 SHORTCUTS
Show/Hide the Pads-Sampler-Custom buttons panel
14 DISPLAY
See Screen for further details
15 BACK
Sets Browser focus to Folders list. If focus is on Folders, open/close sub-folders
16 FWD
Cycles focus between available Browser Lists (folders, Songs, Sideview)
17 BROWSE
Scrolls through Files and Folders in the focused Browser list.
Push to get the Browser view. When in Browser view, pus to load the selected track to the Deck.
Double-fast-push to clone the Track (and its position and playback status) from the other Deck
Cycle through the available lists of Sideview (Automix, Sidelist, Karaoke, Sampler and Shortcuts).
Push to add the selected track of Songs List to the selected List of Sideview (Automix, Sidelist, Karaoke)
18 TORGUE ADJUST
Adjust the torgue of the motor wheel
19 STOP TIME
Adjust the time the track will need to completely stop. Set to Min for instant stop
20 MOTOR
Enable/disable Motor
21 SYNC
Match the corresponding Deck's tempo and phase with the opposite Deck's (or the Master Deck’s if using a 4 decks Skin) tempo and phase
22 MASTER
Manually set this deck as Master Deck.
23 KEYLOCK
Lock the track's key to its original value regardless the track's Tempo changes.
Smoothly reset Track's tempo to its original value
24 PITCH
Adjust the track's playback speed (tempo). When pitch fader is at the middle position (track is playing at its original speed), the white center LED will be lit.
When the green-arrow LEDs are lit, the pitch fader has to be moved to the direction the arrows indicate, in order to catch the pitch value of the deck. This is mostly happening when decks are swapped (via the LAYER button) and the pitch value of one deck is different than the other.
Note that this Hardware-takeover is not following the soft-takeover of VirtualDJ, meaning that if SHIFT is pressed, the arrows will not indicate the direction the pitch fader needs to be moved to in order to re-gain pitch control, but the ghost-fader on the GUI will be an aid
25 SLIP
Enable/disable Slip mode. When enabled, several actions like scratching, Hotcues, Loops etc will act temporary, and the track will resume playing from the position it would have been if the action was never triggered.
26 PITCH BEND
Hold down to temporary speed up/slow down the song while pressed. When released, the track playback will return to the speed designated by the Pitch Fader.
Select the previous/next available % range of the Pitch Fader
27 PAD MODES
Set Pads to a Pads page.
HOTCUE: Hotcues page (1st press), CueLoop page (2nd press)
LOOP : Loop page (1st press), Saved Loops page (2nd press)
ROLL : Loop Roll page (1st press), KeyCue page (2nd press)
SLICER : Slicer page (1st press), Sampler page (2nd press)
See further details in VirtualDJ Manual - Pads
28 PARAMETER
Adjust the 1st Parameter of the selected Pads page
Adjust the 2nd Parameter of the selected Pads page
29 PADS
 

REAR PANEL - CONNECTIONS
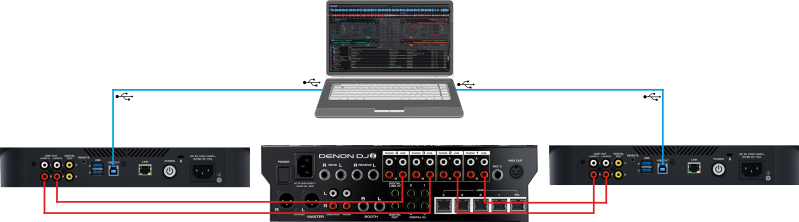


2 x Denon SC5000M + Mixer Connections


Denon SC5000M - Rear panel


CONNECTION

30 LINE OUT - LAYER A
Use standard RCA cables to connect this output to your DJ mixer and send out the audio signal from Layer A. Denon This output is used only in Standalone mode.
31 LINE OUT - LAYER B
Use standard RCA cables to connect this output to your DJ mixer and send out the audio signal from Layer B. This output is used only in Standalone mode.
32 DIGITAL OUT
Use standard digital coaxial cables to connect these 24-bit/96 KHz outputs to devices and mixers such as the Denon DJ X1800/X1850 Prime mixers.
33 REMOTE
Use a standard remote start cable to connect this input to the remote-start output of your mixer (if available). While connected to a remote-start-compatible mixer, moving the crossfader toward the side that corresponds to this SC5000M Prime (or raising the channel fader for its channel) will automatically start the track on the currently selected layer.
34 USB HUB
Connect standard USB drives to these USB ports. When you select one of those USB drives as a source (press the Source button), you can use the display to select and load tracks on your USB drives. There is also a similar USB port on the front panel.
Note that devices connected to these ports will not be available as Computer devices, if the SC5000M is in Standalone mode
35 USB
Use the provided USB cable (included) to connect this USB port to an available USB port on your computer. This connection sends and receives MIDI messages to and from the computer when the SC5000M is set to Computer mode
36 LINK
Use the included networking cable to connect this port to another SC5000M Prime or to your Denon DJ X1800/X1850 Prime mixer. Each networked SC5000M Prime can share track databases, timing and BPM information, and other track data over this connection.
This connection is not used in Computer mode.
37 POWER BUTTON
Press this button to power SC5000M Prime on or off. Power on SC5000M Prime only after you have connected all of your input devices and before you power on your amplifiers and loudspeakers. Power off your amplifiers and loudspeakers before powering off SC5000M Prime.
Press and hold this button for 10 seconds to reset SC5000M Prime.
38 POWER INPUT
Use the included power cable to connect this input to a power outlet. SC5000M Prime has a protection circuit to keep it powered on for 10 seconds after an unexpected power loss. Within 10 seconds after losing power (you will see a message in the display), reconnect it to your power source to return to normal operation.
 

SC5000M SCREEN


SC5000M has a fully functional and customize-able 7" touch-screen offering all the information needed for your mix. The default UI for the screen will be automatically downloaded the first time you connect the SC5000M to a computer running VirtualDJ (Internet connection is required at least for the 1st time)

The default UI of SC5000M offers 3 main views:
- Full Deck View (default) with Deck information, including Pads and Sampler panels.
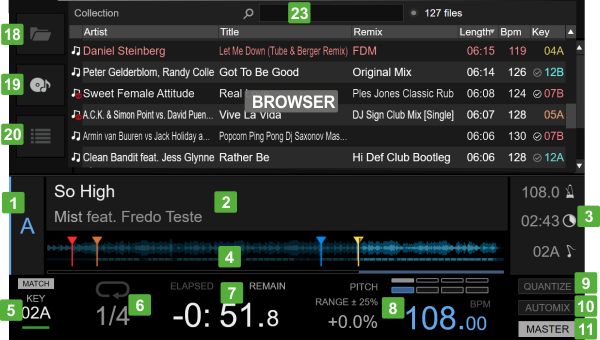
- Basic Deck View , with Basic Deck information (without Pads and Sampler), and a small Browser view
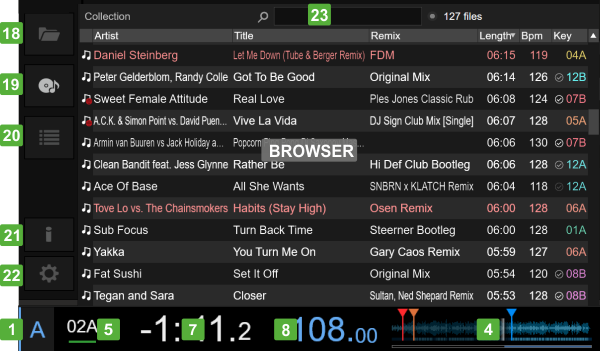
- Full Browser view with Midi Deck..

Use the SHORTCUTS button on the SC5000M to toggle between the Full and Basic Deck views.
Use the VIEW button to toggle between Deck and Browser views.


Denon SC5000M Screen - Full Deck view


Denon SC5000M Screen - Basic Deck view


Denon SC5000M Screen - Browser View


1
Indicates the Deck that the device is controlling. Tap to switch to a different Deck
2
Track's Title, Remix and Artist. Tap this area to see other Track's info such as Album, Year, Genre and Comment.
3
Track's Length, original BPM and Key. Tap Key value to toggle between Musical and Camelot value.
4
Track's progress wave with Hotcues markers. Can be locked from Settings to prevent accidental taps
5
Track's musical key information. Key value can be displayed in Harmonic or Camelot view. Line is colored based on the key value. The MATCH text will be highlighted when Track's key matches the key of the other Deck.
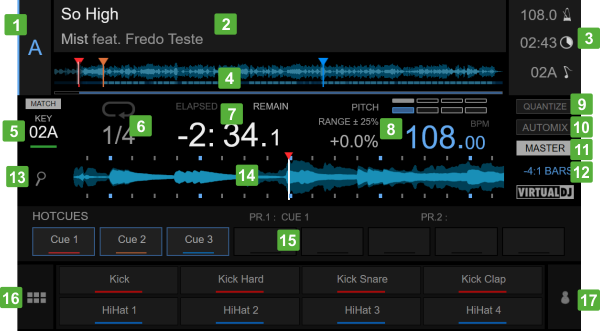
Tap this area to get more key controls at the Deck info area.
6
Current Loop size in beats.
7
Track's Time. Tap this area to toggle between Elapsed and Remain Time.
8
Track's Tempo information : Current BPM, Pitch, Pitch range%
Tap the BPM value area to to get Beat-grid Adjust controls at the Deck Info area.
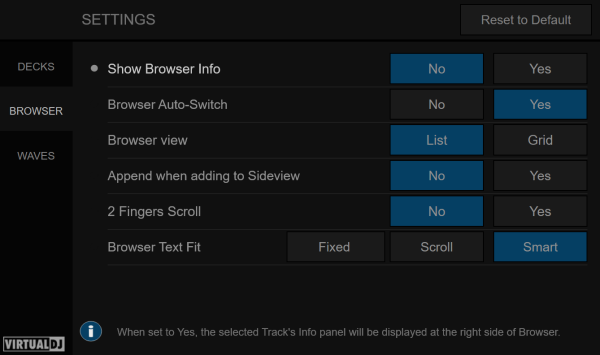
9
Quantize. Tap to enable/disable.
10
Automix. Tap to enable/disable Automix on this deck.
11
Master Deck indicator
12
Beat-grid information in Bars : Beats
13
Wave Zoom mode. Tap to enable (icon will blink) and then use the BROWSE encoder to zoom the waveform in/out. Tap again to disable the Zoom mode.
14
Waveform.Can be locked (from accidental touch) or displayed in different colors and types, depending on the settings that can be found in the WAVES tab of SETTINGS view
15
Performance Pads. Displays the name of the currently selected Pads page, the values of its Parameters (if available) and information about the Pads functionality of the selected page.
16
Show/hide Sampler Bank and Sampler mode controls.
17
Show/hide Custom Buttons panel
18
Select to view the Folders List.
19
Select to view the Songs List.
20
Select to view the Sideview. Tap again to cycle through the available lists of Sideview (Automix, Sidelist, Karaoke, Sampler and Shortcuts.
21
Browser Info. Tap to show/hide Info panel on the right side of the Browser for the browsed track. See VirtualDJ Manual on how to customize what this panel will display
22
Text Options. Tap to show/hide buttons to enlarge/reduce the Font size and 3 levels of Line padding
23
Tap to get the On-Screen Keyboard and search for tracks in your Library


SETTINGS


Hold down the [VIEW] button for more than 2 seconds to get the SETTINGS view. Press the VIEW button again to go back to the Decks view.
Various settings are offered to adjust views, Waves, Browser behavior etc. and their values will be kept across sessions. A description of each setting is displayed at the bottom of the view, each time you tap, select or change a setting.


Denon SC5000M screen - Settings view


For further Technical features and specifications, visit

Denon DJ SC5000M Prime
Product's Page


Hardware Integration Department
2020 - ATOMIX PRODUCTIONS


Reproduction of this manual in full or in part without written permission from Atomix Productions is prohibited.